

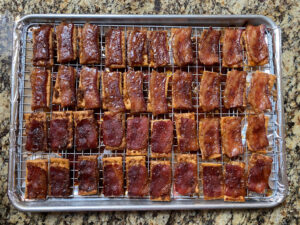
Candied Bacon Crackers
Buttery crackers are topped with smoked bacon and brown sugar to create this yummy, sweet, and savory treat! Perfect for entertaining but beware they’re very addictive and disappear quickly!
Servings: 40 crackers
Ingredients
- 1 pkg. buttery crackers (36-40 rectangle crackers like Townhouse or Club crackers
- 1 lb. sliced smoked bacon cut into thirds
- 1 c. dark brown sugar
- Fresh cracked black pepper to taste
- Red pepper flakes or cayenne pepper for sprinkling optional
Instructions
- Preheat the oven to 350 degrees. Line a rimmed baking sheet with aluminum foil and place a wire rack over the foil.

- Align crackers on top of the wire rack. (Leave a little space in between the crackers for the bacon, as it will hang over the edges of the crackers.)

- Slice the bacon into thirds. Place a piece of cut bacon lengthwise on each cracker.
- Sprinkle a generous amount of brown sugar on top of the bacon-topped crackers (about 1 heaping teaspoon per cracker). Then lightly sprinkle with black pepper, red pepper flakes or cayenne pepper if using.

- Bake for 15-20 minutes or until brown sugar melts, and the bacon is crisp. Allow crackers to cool on wire rack before eating.


