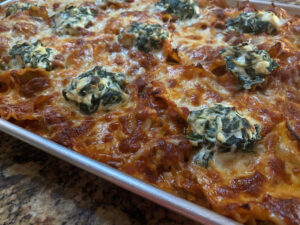
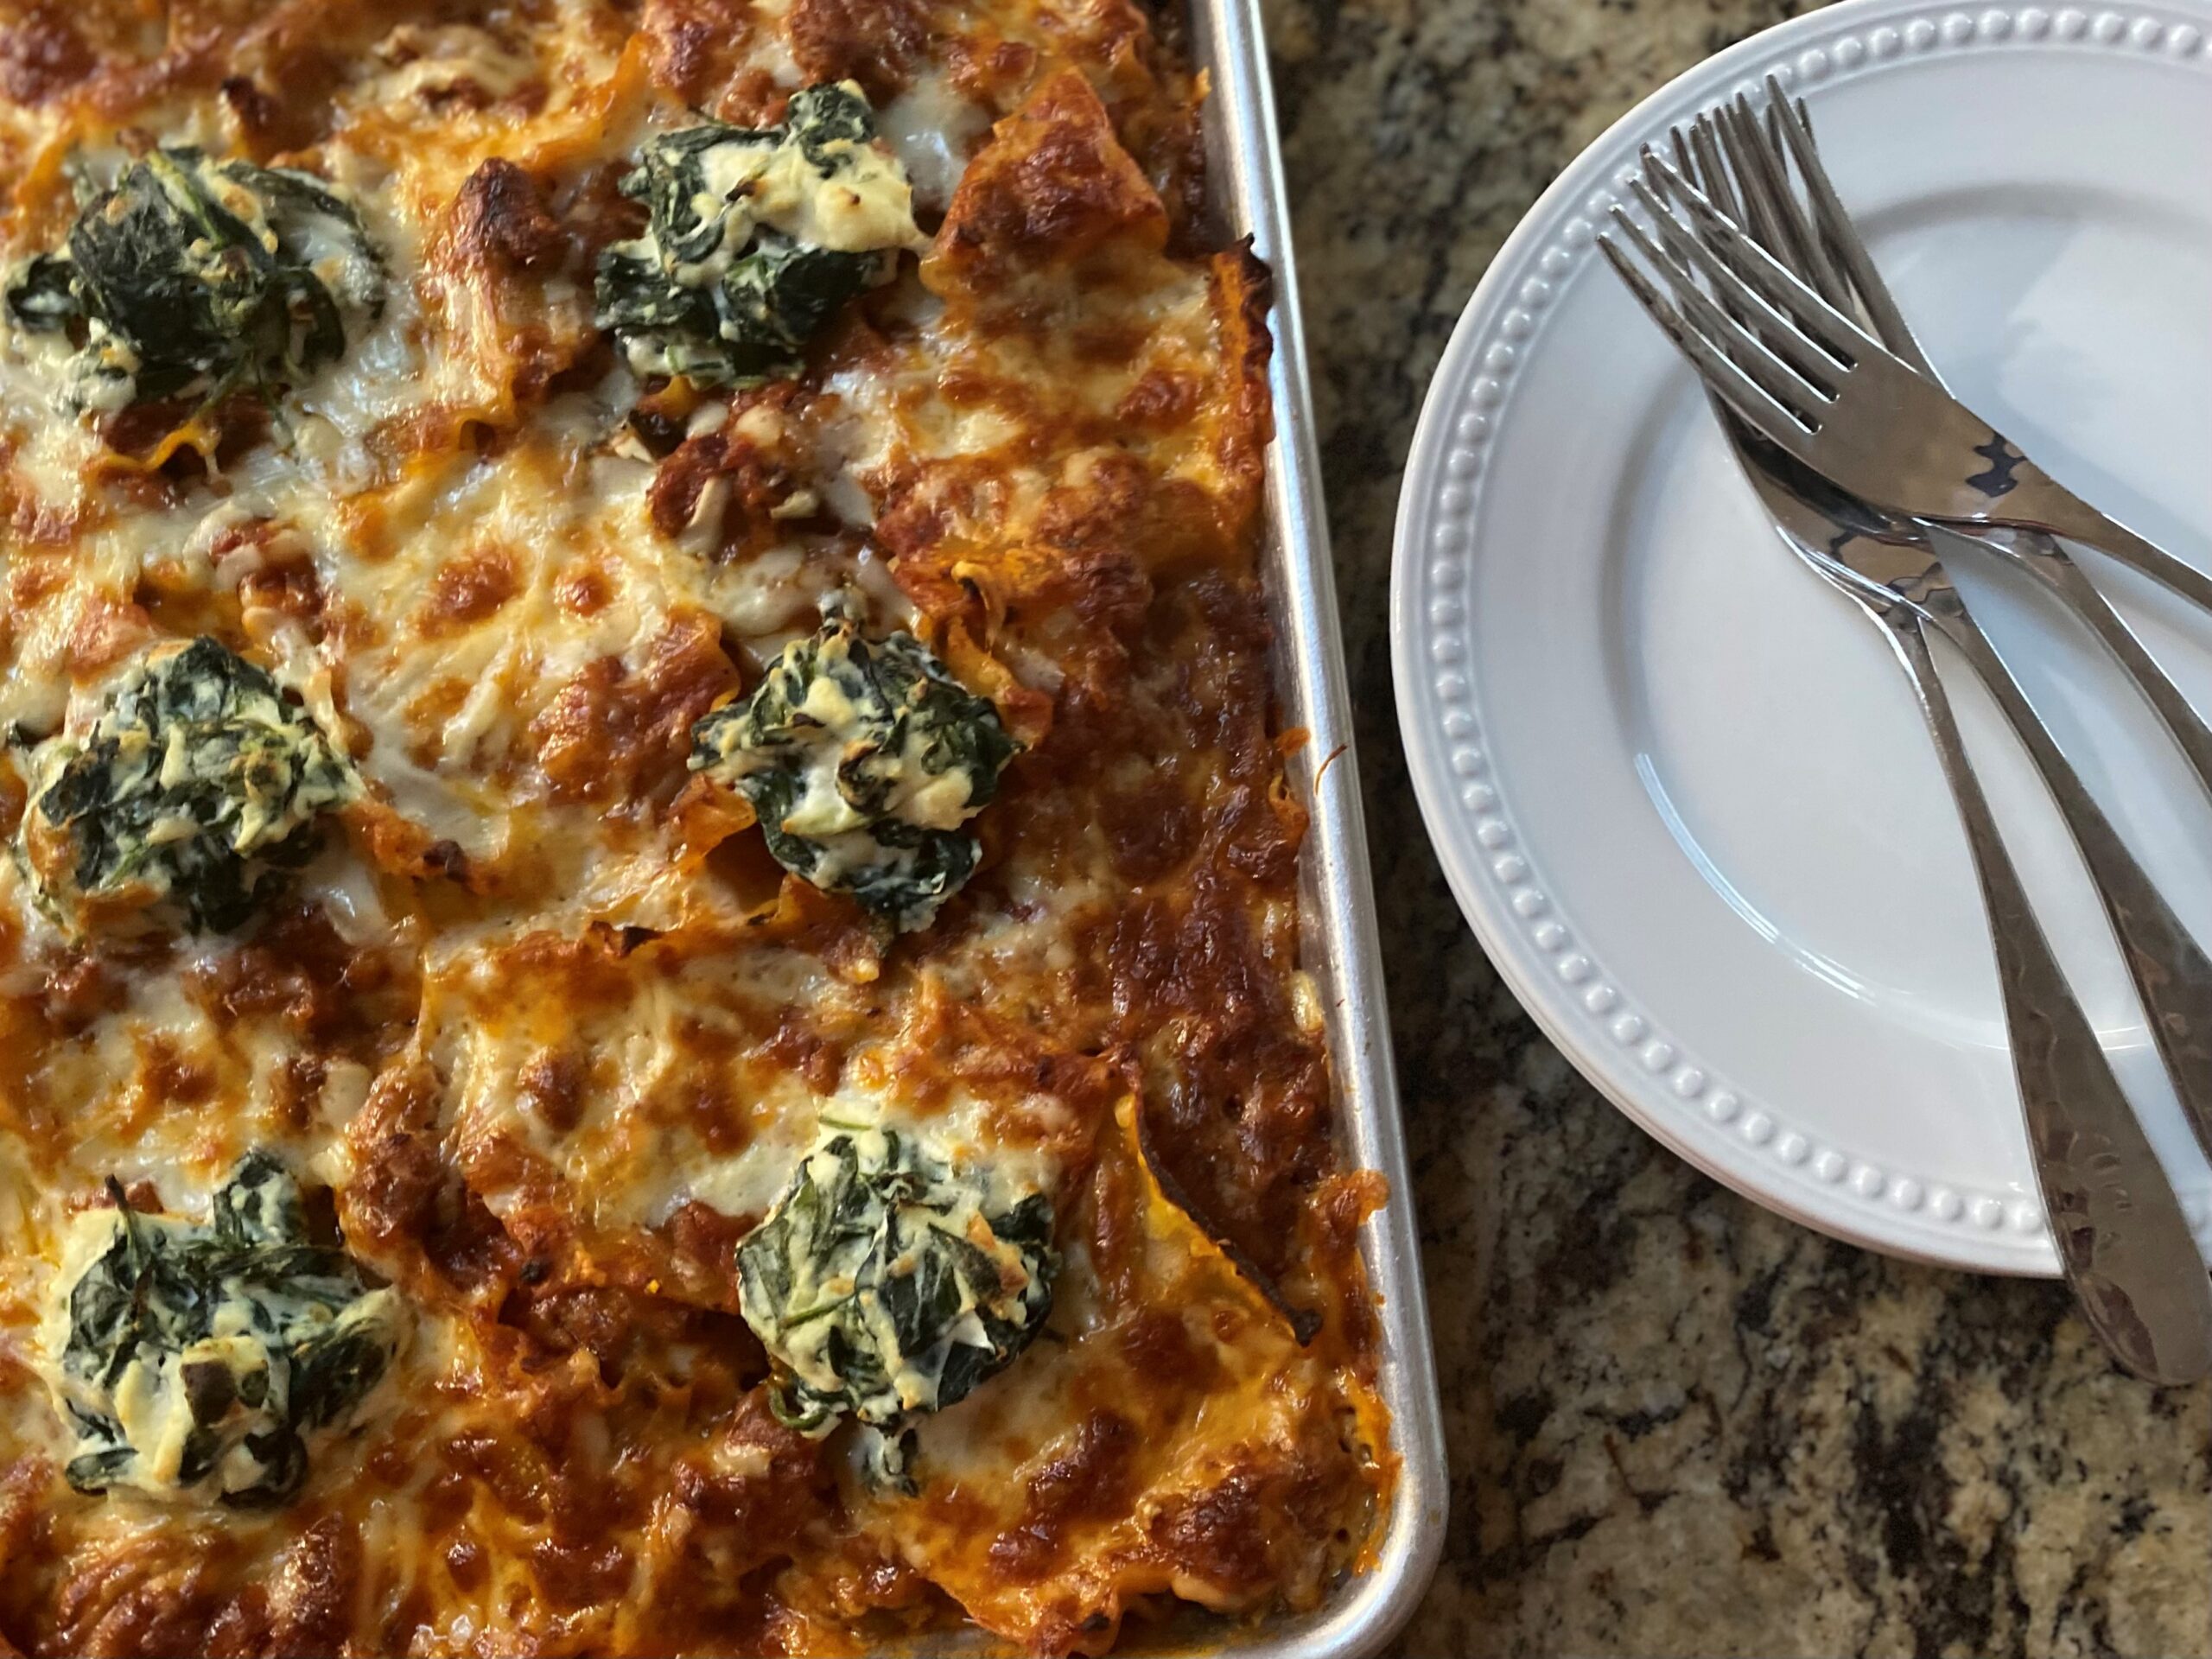
• Home
  • About
  • Contact
  • Terms of Service
  • Blog
  • Submit A Recipe

Cooking Mamas

Tried and True Family Recipes

Subscribe to Our Newsletter

  • Appetizers
    • Canapés
    • Cold Dips
    • Hors d’ oeuvres
    • Salsas
    • Snacks
    • Vegetable
    • Warm Dips
  • Beverages
    • Cocktails
    • Coffee, Tea & Cocoa
    • Malts & Shakes
    • Non-Alcoholic
    • Punch
    • Smoothies
  • Breads
    • Biscuits & Scones
    • Bread Machine
    • Corn Breads
    • Dinner Rolls
    • Muffins
    • Quick Breads
    • Sweet Rolls
    • White & Whole Grain Breads
  • Breakfast
    • Eggs
    • French Toast
    • Fruit
    • Oatmeal
    • Pancakes
    • Waffles
    • Yogurt
  • Canning
    • Freezer
    • Fruits
    • Jams & Jellies
    • Pickles
    • Vegetables
  • Condiments
    • Butters & Spreads
    • Gravy
    • Marinades
    • Salad Dressings
    • Sauces
    • Seasonings
    • Spice Rubs
  • Desserts
    • Bars & Brownies
    • Cakes
    • Candy
    • Cheesecake
    • Cobblers, Crumbles & Crisps
    • Cookies
    • Cupcakes
    • Custards & Pudding
    • Dessert Jars
    • Fondue
    • Frosting & Icing
    • Fruit Desserts
    • Ice Cream
    • Pies
  • Entree
    • Beans & Legumes
    • Beef
    • Casseroles
    • Chicken
    • Eggs
    • Fish & Seafood
    • Instant Pot
    • Lamb
    • Pasta
    • Pizza
    • Pork
    • Sandwiches & Wraps
    • Slow Cooker
    • Turkey
  • Salads
    • Bean & Legume Salads
    • Egg Salads
    • Fruit Salads
    • Green Salads
    • Jell-O Salads
    • Main Dish Salads
    • Meat Salads
    • Pasta Salads
    • Potato Salads
  • Sides
    • Dressing & Stuffing
    • Pasta
    • Potato
    • Rice
    • Vegetable
  • Soup
    • Beans & Chili
    • Broth Soups
    • Creamy Soups
    • Fruit Soups
  • Holidays
    • New Year’s Eve
    • Valentine’s Day
    • Mardi Gras
    • St. Patrick’s Day
    • April Fool’s Day
    • Easter
    • Cinco de Mayo
    • Mother’s Day
    • Memorial Day
    • Father’s Day
    • 4th of July
    • Labor Day
    • Fall Harvest
    • Thanksgiving
    • Christmas
    • Game Day
    • GLAMping Gourmet

Sheet Pan Lasagna

January 12, 2023 By Cooking Mamas Leave a Comment

Print Recipe

Sheet Pan Lasagna

The best part of the lasagna is the crispy edges and cooking it on a sheet pan insures that! Serve with a beautiful green salad and a warm loaf of garlic bread.
Course: Entrée
Cuisine: American, Italian
Servings: 16

Ingredients

  • 4 T. olive oil divided
  • 1 clove garlic pressed
  • 1/2 tsp. red pepper flakes
  • 1 (5 oz.) container baby spinach
  • 1/2 tsp. kosher salt plus more for the pasta water
  • 1 c. whole milk ricotta cheese
  • 1 lb. spicy Italian sausage casings removed
  • 1 med. red onion diced
  • 1 lb. lasagne noodles broken into 2-inch pieces
  • 1 (32 oz.) jar marinara sauce (I use RAOS tomato basil sauce)
  • 2 1/2 c. shredded low moisture mozzarella cheese divided
  • 1 1/2 c. freshly grated parmesan cheese divided

Instructions

  • Preheat the oven to 425 degrees. Grease a rimmed 12×17-inch baking sheet with 1 tablespoon of olive oil; set aside.
  • Heat 1 tablespoon olive oil in a Dutch oven over medium heat. Once hot add the garlic and red pepper flakes. Cook, stirring until fragrant about 1 minute.
  • Add spinach and 1/2 teaspoon kosher salt. Cook stirring frequently until the spinach is almost wilted about another minute. Remove the spinach mixture to a strainer pressing firmly to remove any excess liquid. Place the spinach in a medium bowl. Using kitchen shears, cut into smaller pieces. Add the ricotta cheese, stir to combine, and set aside.
  • Use a paper towel to wipe out the Dutch oven and return over medium heat. Add the remaining 2 tablespoons of olive oil and sausage. Cook undisturbed, until the sausage is brown on the first side, about 3 minutes. Using a wooden spoon, break apart the sausage into bite-size pieces, turn and cook on the other side for about 3-5 minutes stirring often. Add the onions to the pan, cook until the onion is fragrant and beginning to soften about 3 minutes. Remove from the heat.
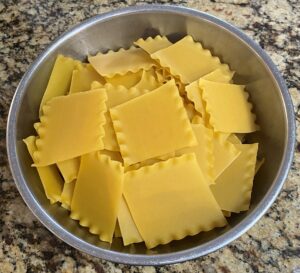
  • Break the lasgne noodles into 2-inch pieces. Bring a large pot of water to a boil over high heat. Season generously with kosher salt. Cook the pasta for 4-5 minutes, stirring often to avoid clumping. Reserve 1/2 cup pasta water and drain well.
  • Meanwhile, add the marinara to the Dutch oven with sausage and onions, stirring to combine. Add the pasta water, pasta, and 1 cup shredded mozzarella, and 1/2 cup grated parmesan cheese to the Dutch oven, gently stir to combine.
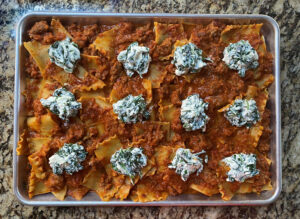
  • Spread the mixture onto the prepared baking sheet.
  • Dollop the pasta with the ricotta mixture. (I did 12 dollops, next time I think I'll do 16.)
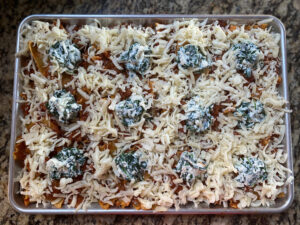
  • Sprinkle with the remaining 1 1/2 cups mozzarella and 1 cup parmesan cheese.
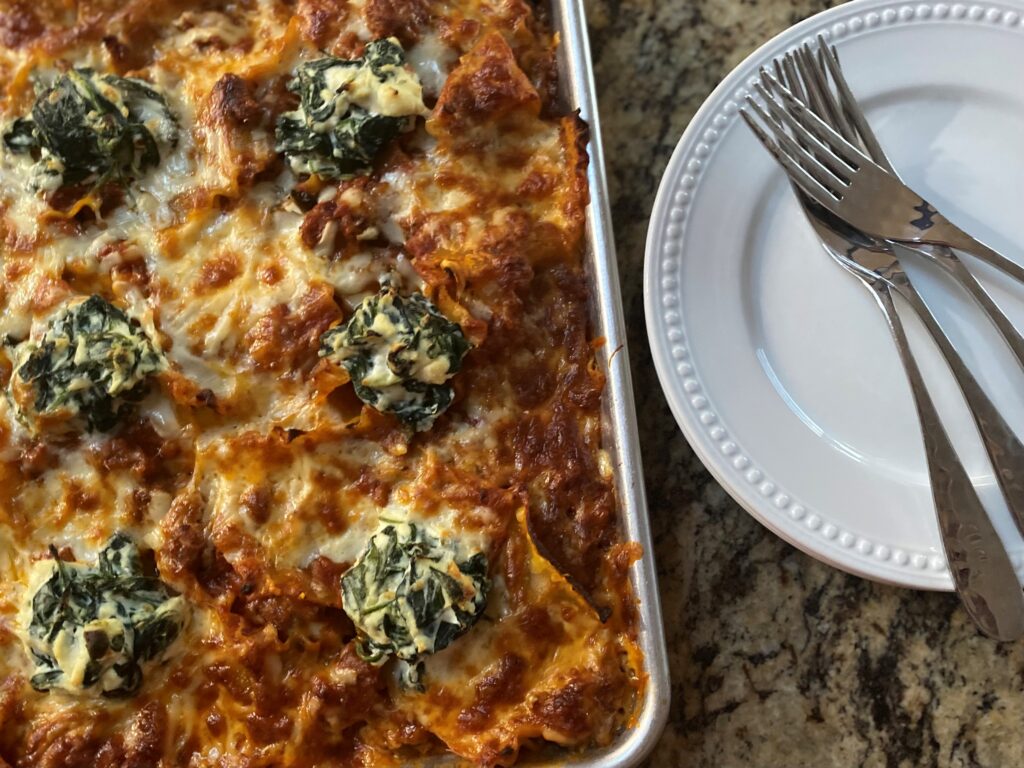
  • Bake until the pasta is tender, the sauce is bubbly, and the top is lightly browned about 25-30 minutes.
  • Remove the lasagna from the oven, allow it to rest for 5 minutes before cutting it into squares and serving. Enjoy!

Notes

Thanks Giada for the inspo! 

Filed Under: Casseroles, ENTREE, Pasta, Pork

Santa Gnome Cupcakes

December 20, 2022 By Cooking Mamas 1 Comment

Print Recipe

Santa Gnome Cupcakes

These adorable Gnome Cupcakes are a fun and festive way to celebrate the holidays!
Course: Dessert
Cuisine: American
Servings: 24 cupcakes

Ingredients

SANTA HATS:

  • red sparkling sugar for sprinkling
  • 2 (12 oz.) pkgs red candy melts divided
  • 24 sugar cones

CUPCAKES:

  • 1 box white cake mix
  • 4 lg. eggs
  • 1 c. milk
  • 3/4 c. melted butter
  • 1 tsp. pure peppermint extract optional

FROSTING:

  • 1 c. butter
  • 5 c. confectioners’ sugar
  • 1 tsp. vanilla
  • milk as needed

DECORATIONS:

  • 24 pink candy gumballs

Instructions

  • SANTA HATS: Line a rimmed baking sheet pan with parchment paper and set aside.
  • Pour the sparkling sugar into a small bowl and set aside.
  • In a microwave safe bowl, melt 1 package of red candy melts according to package directions. Stack two solo cups together (to make the cup sturdy and clean up a breeze) and pour the melted candy into the cup.
  • Take a sugar cone and dip the pointed end of the cone into the melted candy, place your pointer and index fingers into the middle of the cone and your thumb on the outside of the cone, now twist the cone in the melted candy gently shaking off any excess (you may need to tip the cup as you dip the remaining 11 cones).
  • Immediately sprinkle the candy cones with sparkling sugar and place on the prepared baking sheet to dry completely, about 1-2 hours. In a separate microwaveable bowl, repeat the steps above with the remaining package of candy melts, 12 cones, and sparkling sugar.
  • CUPCAKES: Preheat the oven to 350 degrees. Line two 12-cup muffin tins with paper cupcake cups; set aside.
  • Pour the cake mix into a large bowl. Make a “well” in the center of the cake mix and add 4 eggs and 1 cup milk. Using an electric hand mixer, beat to combine. Slowly add the melted butter and peppermint extract, if using and continue to beat for 2 minutes.
  • Using an ice cream scoop, fill each cupcake cup 1/2 full. Bake according to package directions, about 14-18 minutes. Cool for about 5-10 minutes before removing from the pans. Transfer cupcakes to cooling racks to cool completely.
  • FROSTING: In a stand mixer fitted with a whisk attachment, beat the butter and confectioners’ sugar on low speed until crumbly, add vanilla extract and 2 tablespoons milk. Increase the speed to high and beat for 3 minutes or until the mixture is thick, creamy, and pale in color adding more milk as needed. (The frosting needs to be a little stiffer than usual, so the gnomes’ beards don’t slide off the sides of the cupcakes. You can test the consistency by piping a small amount on the outside of a drinking glass. If the frosting sticks, it is firm enough. If it slides down the side of the glass, then add more confectioners’ sugar to the frosting.)
  • TO ASSEMBLE: Put the frosting into a large piping bag fitted with a star tip. Pipe some frosting on the top of a cupcake. Place a “hat” on top of the frosted cupcake. Pipe frosting down the front of the cupcake swirling back and forth to create the beard. Pipe a pom pom on top of the hat. Place a gumball in front of the hat right above the beard to create a “nose.” (You can pipe frosting on either side of the nose to create a “mustache” if desired.) Repeat with the remaining cupcakes.

Notes

I purchased these cute Santa Cupcake Wrappers here: https://www.etsy.com/listing/878292759/santa-belt-cupcake-wrappers-printable 

Filed Under: Christmas, Cupcakes, DESSERTS, HOLIDAYS

Shrimp and Corn Chowder

December 18, 2022 By Cooking Mamas Leave a Comment

Print Recipe

Shrimp and Corn Chowder

Smoky, sweet, and loaded with juicy shrimp, golden corn, and bacon! Erik Moris says, “This chowder is off the charts. Finished a bowl in record time. Just the right amount of everything!!!”
Course: Soup
Cuisine: American
Servings: 4
Author: Chef Mo – Melinda Marvick

Ingredients

  • 1 lb. frozen peeled & deveined shrimp thawed and cut into bite sized pieces
  • 1-2 T. Emeril's Original Essence
  • 2 med. potatoes cut into bite sized pieces, and cooked
  • 6 slices thick-cut bacon cut into ½-inch pieces
  • 3 T. butter divided
  • 4 sm. green onions thinly sliced
  • 2 stalks celery diced small
  • 4 cloves garlic minced
  • 1/2 tsp. kosher salt
  • 1/4 tsp. black pepper
  • 2 T. all-purpose flour
  • 2 2/3 c. milk heated
  • 1 1/2 c. fresh or frozen corn kernels about 3 ears if using fresh
  • 1 (15 oz.) can cream-style corn
  • 1/2 tsp. ground cayenne pepper or to taste
  • 1 tsp. chopped fresh thyme
  • 1/3 c. half-and-half
  • Hot sauce optional for serving

Instructions

  • Place the shrimp in a large Ziplock bag. Add 1 to 2 tablespoons Emeril's Essence and shake the bag to coat the shrimp.
  • Melt 2 tablespoons butter in a large skillet and cook the shrimp through; set aside.
  • Cook the bacon in a Dutch oven or large, deep saucepan over medium heat until crisp, about 6 minutes. With a slotted spoon, remove the bacon from the pan and transfer to a paper-towel-lined plate. Lightly pat dry and set aside. Discard all but 1 tablespoon bacon fat.
  • Add the remaining tablespoon of butter to the same pot and let it melt. Add the green onions and celery. Cook, stirring occasionally, until the veggies are tender, about 3 minutes, then stir in the garlic, salt, and black pepper. Cook until the garlic is fragrant, about 30 seconds.
  • Sprinkle the flour over the top of the onion mixture, then cook, stirring constantly, for 1 minute.
  • Slowly pour in the milk, a few splashes at a time at first, stirring out any lumps. Stream in the rest of the milk, then add the corn kernels, cream-style corn, and cayenne. Stir and bring to a gentle boil. Let bubble until thickened, about 5 minutes.
  • Stir in the shrimp, bacon, and potatoes. Remove from the heat, then stir in the thyme and half-and-half.
  • Serve hot garnished with bacon, green onion tops, and/or a dash or two of hot sauce as desired.

Filed Under: Creamy Soups, SOUP

Hot Turkey Sandwiches

November 21, 2022 By Cooking Mamas Leave a Comment

Print Recipe

Hot Turkey Sandwiches

Roasted turkey, savory dressing, and homemade cranberry sauce served over toasted bread, then covered with hot gravy! A delicious way to use up Thanksgiving leftovers!
Course: Entrée
Cuisine: American
Servings: 2

Ingredients

  • 2-4 slices toasted rustic bread white, wheat, or sourdough
  • Leftover stuffing warmed
  • Leftover cranberry sauce
  • Leftover turkey warmed
  • Leftover turkey gravy warmed

Instructions

  • Warm the turkey, stuffing, and gravy. Toast and butter the bread.
  • To assemble the sandwiches: Place a piece of toast on a serving plate. Top with a layer of stuffing, followed by cranberry sauce, ending with turkey.
  • Pour the hot turkey gravy over the top of the sandwich. Season with fresh cracked pepper and garnish with fresh chopped parsley if desired.

Filed Under: Christmas, ENTREE, HOLIDAYS, Sandwiches & Wraps, Thanksgiving, Turkey

Leftover Stuffing Waffles with Maple Gravy

November 21, 2022 By Cooking Mamas Leave a Comment

Print Recipe

Leftover Stuffing Waffles with Maple Gravy

Transform leftover stuffing into crispy, savory, waffles drizzled with maple gravy, then topped with homemade cranberry sauce and/or a poached egg, Enjoy!
Course: Breakfast
Cuisine: American
Servings: 4

Ingredients

  • 4 c. leftover stuffing
  • 2 lg. eggs lightly beaten
  • 1/2 c. shredded cheddar cheese
  • 1-3 T. milk as needed
  • 1 c. leftover gravy
  • 1 T. maple syrup
  • 1/4 c. leftover cranberry sauce optional
  • 4 poached eggs optional

Instructions

  • In a large bowl, combine stuffing, 2 lightly beaten eggs, and cheddar cheese. If the batter is too dry, add milk 1 tablespoon at a time. (Note: The stuffing should be moist and dense, not mushy.)
  • Preheat your waffle iron. Spray the waffle iron with nonstick cooking spray.
  • Spread the stuffing mixture across the surface of the iron.
  • Cook until both sides are golden brown and crispy, about 4-6 minutes. (Note: These waffles take more time to cook. Don’t repeatedly open the waffle iron while the waffle is cooking, or it will lose its shape.) Gently open the iron and remove the waffle with a fork and spatula. Repeat with the remaining batter.
  • Meanwhile, in a small saucepan, combine the gravy and maple syrup over low heat.
  • Serve waffles warm, drizzled with maple gravy. Top with leftover cranberry sauce and/or a poached egg if desired. Devour immediately!

Notes

Note: I used a Belgian waffle iron.

Filed Under: BREAKFAST, Christmas, Dressing & Stuffing, HOLIDAYS, SIDES, Thanksgiving, Waffles

Fall Mini Pie Charcuterie

November 15, 2022 By Cooking Mamas 3 Comments

Print Recipe
5 from 1 vote

Fall Mini Pie Charcuterie

This fun and festive dessert charcuterie board is filled with an assortment of mini pies, maple sandwich cookies, red and green grapes, apple slices, and cinnamon whipped cream! Perfect for a holiday party or family gathering!
Course: Dessert
Cuisine: American
Servings: 20

Ingredients

CHARCUTERIE:

  • 4-6 mini pecan pies
  • 4-6 mini sweet potato pie
  • 4-6 mini apple pies
  • 4-6 mini cherry pies
  • 2-3 mini pumpkins optional for decoration
  • 1 box maple leaf sandwich cookies
  • Pecan halves
  • Red and/or green grapes
  • Red and/or green apple slices

CINNAMON WHIPPED CREAM:

  • 1 c. heavy whipping cream
  • 3 T. confectioners’ sugar
  • 1 tsp. vanilla extract
  • 1/4 tsp. ground cinnamon

Instructions

  • CHARCUTERIE: Using a 20-24-inch rimmed round charcuterie board, place a serving bowl in the middle of the board to hold the whipped cream. Arrange the pies around the board, adding 2-3 mini pumpkins for decoration.
  • Arrange maple cookies between pies and around the whipped cream bowl. Fill in the bare spots with pecan halves, grapes, and apple slices. Viola, you have a beautiful Fall charcuterie board!
  • CINNAMON WHIPPED CREAM: Before you begin, place your mixing bowl and beaters in the freezer for 5 to 10 minutes to chill. Once chilled, remove the bowl and beaters from the freezer.
  • Add the heavy whipping cream, confectioners’ sugar, vanilla, and cinnamon to the bowl of a stand mixer fitted with the whisk attachment OR in a large mixing bowl using a handheld mixer. Beat on low speed. Once the mixture starts to increase in volume, increase the speed to medium-high until stiff peaks form. Do not overbeat. Refrigerate the whipped cream for 1-2 hours or until ready to use. Makes 2 cups.

Notes

I purchased these mini pies from Etsy, Target, and Walmart. If you prefer homemade mini pies, simply purchase 4-inch pie tins from Amazon and make my pies below.
Sweet Potato Pie – https://www.cookingmamas.com/sweet-potato-pie/
Cherry Pie – https://www.cookingmamas.com/cherry-pie/
Southern Pecan Pie – https://www.cookingmamas.com/southern-pecan-pie/
Blue Ribbon Apple Pie – https://www.cookingmamas.com/blue-ribbon-apple-pie/
Inspired by the Reluctant Entertainer ❤️

Filed Under: Christmas, DESSERTS, Fall Harvest, HOLIDAYS, Pies, Thanksgiving

Butternut Squash Ravioli with Brown Butter Sauce

November 15, 2022 By Cooking Mamas Leave a Comment

Print Recipe

Butternut Squash Ravioli with Brown Butter Sauce

Fresh butternut squash ravioli tossed in a brown butter sauce with crispy sage, garlic, and lots of Parmigiano-Reggiano cheese, Enjoy!
Course: Entrée
Cuisine: American, Italian
Servings: 2

Ingredients

  • 1 (10 oz.) pkg. butternut squash ravioli fresh or frozen
  • 1/4 c. chopped pecans
  • 4 T. salted butter
  • 10 fresh sage leaves
  • 2 cloves garlic peeled and slightly smashed
  • Freshly ground black pepper to taste
  • 1/4 c. freshly grated Parmigiano-Reggiano cheese for serving

Instructions

  • Bring a large pot of salted water to a boil.
  • Meanwhile, in a large dry skillet over medium heat toast the pecans shaking the pan frequently. Remove the pecans to a plate and wipe the pan clean.
  • In the same skillet, melt the butter and add sage and garlic. As it begins to foam, keep stirring and swirling the pan. At this point add the ravioli to the salted boiling water and cook according to the package directions, about 4 minutes.
  • After a few minutes the butter will turn from a lemon-yellow color to a light brown. A few minutes more and you’ll begin to see tiny dark specks starting to form on the surface of the pan, these are milk solids. Once you see the butter turning a deeper brown color, it will release a nutty aroma. This is when the butter is properly browned. (If at any point the nutty aroma smells like burning, or the milk solids begin to turn black, immediately remove from the heat.)
  • Turn the heat off. Remove the sage to a plate and discard the garlic. Carefully add 2 ounces of pasta water to the browned butter. Using a slotted spoon transfer the cooked ravioli from the pot of water straight into the butter sauce. Gently toss to coat the ravioli with the sauce.
  • Serve pasta garnished with crispy sage leaves, toasted pecans, freshly ground black pepper to taste, and grated Parmigiano-Reggiano cheese!

Filed Under: ENTREE, HOLIDAYS, Pasta, Pasta, SIDES, Thanksgiving

Apple Cranberry Coleslaw

November 15, 2022 By Cooking Mamas Leave a Comment

Print Recipe

Apple Cranberry Coleslaw

This coleslaw is loaded with fresh apples, dried cranberries, chopped walnuts, and green onions! It’s sweet, crunchy, and oh so delicious!
Course: Salad
Cuisine: American
Servings: 6

Ingredients

COLESLAW:

  • 1 (14 oz.) bag tri-color coleslaw
  • 1 lg. red apple diced and tossed with some lemon juice
  • 1/2 c. dried cranberries
  • 1/2 c. chopped walnuts sliced
  • 4 green onions

DRESSING:

  • 1/2 c. mayonnaise
  • 1/2 c. plain yogurt not Greek
  • 1/4 c. honey
  • 1/2 tsp. dried ground ginger

Instructions

  • COLESLAW: In a large bowl, toss together the coleslaw mix, diced apple, dried cranberries, walnuts, and green onions until combined.
  • DRESSING: In a small bowl, whisk together mayonnaise, yogurt, honey, and ginger until well combined.
  • Pour the dressing over the coleslaw and gently stir until evenly coated. Refrigerate until ready to serve.

Filed Under: Christmas, Fall Harvest, HOLIDAYS, SALADS, Thanksgiving, Vegetable Salads

Creamy Mushroom Chicken

November 1, 2022 By Cooking Mamas Leave a Comment

Print Recipe

Creamy Mushroom Chicken

A warm comforting meal the whole family will love. Serve over your choice of mashed potatoes, rice, noodles or zoodles, Enjoy!
Course: Entrée
Cuisine: American
Servings: 4

Ingredients

CHICKEN:

  • 2 (8-10 oz.) chicken breasts sliced in half lengthwise
  • 1/4 c. all-purpose flour
  • 1 tsp. garlic powder
  • 1 tsp. salt
  • 1/2 tsp. black pepper
  • 1 T. olive oil
  • 1 T. unsalted butter

MUSHROOM SAUCE:

  • 1 (8 oz.) pkg. button mushrooms
  • 3/4 c. heavy cream
  • 3/4 c. chicken stock
  • 1/3 c. freshly grated parmesan cheese
  • 2 lg. cloves garlic pressed
  • 1 T. finely chopped fresh parsley
  • 1 T. finely chopped fresh chives
  • 1 T. unsalted butter
  • 1 tsp. lemon juice
  • Salt and black pepper to taste

Instructions

  • CHICKEN: Slice each chicken breast in half lengthwise to create 4 even-sized breasts.
  • In a large shallow dish, combine flour, garlic powder, salt, and black pepper. Pat dry the chicken breasts with paper towels. Dredge each chicken breast through the flour mixture to coat, then shake off excess and place to one side.
  • Add 1 tablespoon of olive oil and 1 tablespoon of butter to a large skillet over medium-high heat. Add the chicken. Fry both sides until golden brown on the outside and the center is cooked through (160-165 degrees). Transfer the chicken to a plate and loosely cover it with foil.
  • MUSHROOM SAUCE: In the same skillet, melt 1 tablespoon of butter and add the mushrooms. Sauté until tender and start to form a golden crust, then reduce the heat to medium, add garlic and sauté for another 1-2 minutes. Pour in the stock and cream, then add chives and parsley. Simmer for 5 minutes or until the sauce begins to thicken slightly.
  • Stir in parmesan, then add a squeeze of lemon juice and salt & pepper to taste. Simmer for another minute or two to thicken the sauce.
  • Add the chicken back to the skillet and baste in the sauce. Serve over mashed potatoes or rice and enjoy!

Filed Under: Chicken, ENTREE

Strozzapreti with Sun Dried Tomato Pesto

November 1, 2022 By Cooking Mamas Leave a Comment

Print Recipe

Strozzapreti with Sun Dried Tomato Pesto

A delicious Italian meat-less pasta dinner that’s ready in under 20 minutes! Buon appetito!
Course: Entrée, Side Dish
Cuisine: American, Italian
Servings: 6

Ingredients

  • 12 oz. strozzapreti pasta
  • 1 (7 – 8 oz.) jar sun-dried tomato halves with oil
  • 1 c. packed fresh basil leaves
  • 2 cloves garlic pressed
  • Salt and freshly ground black pepper to taste
  • 1/2 c. freshly grated Parmesan cheese or soy dairy-free parmesan cheese

Instructions

  • Cook the pasta in a large pot of boiling salted water until tender but still firm to the bite, stirring occasionally, about 8 minutes. Drain, reserving 1 cup of the cooking liquid.
  • Meanwhile, combine the sun-dried tomatoes and their oil, basil leaves, garlic, salt, and pepper to taste in a food processor and pulse until the tomatoes are finely chopped. Transfer the tomato mixture to a large bowl and stir in the Parmesan cheese.
  • Add the pasta to the pesto and toss to coat, adding enough reserved cooking liquid to moisten. Season the pasta with salt and pepper to taste. Enjoy warm or cold.

Filed Under: ENTREE, Pasta, Pasta, SIDES

Egg Roll Soup

November 1, 2022 By Cooking Mamas Leave a Comment

Print Recipe

Egg Roll Soup

Turn your favorite appetizer into a delicious soup! Spicy pork sausage and diced veggies simmered in a flavorful broth, topped with sesame seeds, green onions, and crunchy wonton strips, enjoy!
Course: Soup
Cuisine: American, Chinese
Servings: 6

Ingredients

SOUP:

  • 1 lb. ground hot pork sausage
  • 2 T. olive oil
  • 1 med. yellow onion peeled and diced
  • 2 med. carrots peeled and diced
  • 3 cloves garlic minced
  • 1 sm. head green cabbage chopped into bite-sized pieces
  • 8 c. chicken or vegetable stock
  • 1 T. freshly grated ginger
  • 1 tsp. toasted sesame oil

GARNISHES:

  • Toasted sesame seeds
  • Thinly sliced green onions
  • Fried egg roll wrappers or store-bought wonton strips

Instructions

  • In a large pot over medium heat cook the sausage for 5-6 minutes, stirring occasionally, breaking up the sausage until browned. Use a slotted spoon to transfer the sausage to a plate and set aside.
  • Add the olive oil and diced onion to the pot, stirring to combine. Sauté for 5 minutes, stirring occasionally. Add the carrots and garlic, sauté for 2 more minutes, stirring occasionally. Add the cabbage, stock, ginger, and cooked sausage, stir to combine.
  • Continue cooking until the soup reaches a simmer. Reduce the heat to medium-low, cover, and simmer for 12-15 minutes, or until the carrots and cabbage are nice and tender.
  • Stir in the sesame oil until combined. Taste and season the soup with a few generous pinches of salt and black pepper as needed.
  • Serve warm garnished with sesame seeds, green onions, and crispy wonton strips.

Notes

To make homemade wonton strips, cut the egg roll wrappers into desired shape/size. Then briefly fry in vegetable oil until golden.

Filed Under: Broth Soups, SOUP, Vegetable Soup

Mediterranean Ravioli

November 1, 2022 By Cooking Mamas Leave a Comment

Print Recipe

Mediterranean Ravioli

Cheese or pesto filled ravioli with sautéed spinach, sun-dried tomatoes, artichokes, and capers.
Course: Entrée, Side Dish
Cuisine: Italian, Mediterranean
Servings: 4

Ingredients

  • 8-10 oz. cheese ravioli or pesto ravioli
  • 2 T. olive oil
  • 1/4 c. sun-dried tomatoes chopped
  • 1 c. artichoke hearts chopped
  • 4 cloves garlic minced
  • 3 T. capers drained
  • 1/2 tsp. Italian seasoning
  • 2 c. fresh baby spinach
  • 1 T. olive oil more if desired
  • 1/4 c. shredded Parmesan cheese

Instructions

  • Cook the ravioli according to package directions until al dente and drain.
  • In a large skillet, heat the olive oil over medium heat. Add chopped sun-dried tomatoes, artichokes, garlic, capers, and Italian seasoning, cook for 2 minutes. Add the spinach and continue cooking and stirring until the spinach wilts.
  • To the skillet with sautéed vegetables, over medium-low heat, add the cooked ravioli and 1 tablespoon of olive oil, and stir. The dish should be salty enough from capers. If it’s not, add more salt (or capers) if needed.
  • Serve in bowls topped with shredded Parmesan cheese, enjoy!

Filed Under: ENTREE, Pasta, Pasta, SIDES

Artisan Bread

November 1, 2022 By Cooking Mamas Leave a Comment

Print Recipe

Artisan Bread

This irresistible bread is super easy to make and only requires 4 ingredients! Crunchy on the outside and soft and tender on the inside! It's delicious slathered with butter, dipped in soups, or made into sandwiches, Enjoy!
Course: Bread
Cuisine: American
Servings: 1 loaf

Ingredients

  • 3 1/2 c. all-purpose flour spooned and leveled
  • 1 1/2 tsp. kosher salt
  • 3/4 tsp. yeast
  • 1 3/4 c. warm water

Instructions

  • In a large bowl, whisk together flour, salt, and yeast. Make a “well” in the flour mixture and pour in the warm water. Using a rubber spatula or wooden spoon, stir to combine. If the mixture is too dry add more water. The dough should be sticky and look like a hot mess!
  • Once combined, cover the bowl with plastic wrap and a tea towel, proof for 5-8 hours at room temperature.
  • Place a Dutch oven (with lid) on the lowest rack of your oven. Preheat the oven (with the Dutch oven) to 425 degrees for 20 minutes before you plan to bake the bread.
  • Dust your work surface with flour. Transfer the dough from the bowl using a rubber spatula to scrape the sides of the bowl. With floured hands fold the dough 4 times onto itself while shaping it into a ball. Flip it over so the smooth side is facing up and transfer it to a piece of parchment paper.
  • Using mitts, carefully remove the Dutch oven from the oven and place it on the stove. Lift the bread using the parchment paper and transfer it to the Dutch oven. Score the bread down the middle with a lame or sharp knife to let steam escape while it bakes. You can make pretty designs if you’d like. Cover with the lid and transfer back to the oven.
  • Bake for 30 minutes (the bread will be pale in color). Carefully remove the lid and bake for another 15 minutes or until the top is golden brown. Remove from the oven and lift the bread out of the Dutch oven using the parchment paper. Cool for 20-30 minutes before slicing. Enjoy warm with butter, dipped into olive oil and balsamic vinegar, or made into your favorite sandwich!

Notes

Rosemary Garlic Bread: Add 1 T. crushed rosemary and 3 cloves chopped garlic to the dough before proofing.

Filed Under: BREADS, White & Whole Grain Breads

Owl Cupcakes

October 20, 2022 By Cooking Mamas Leave a Comment

Print Recipe

Owl Cupcakes

These chocolate and vanilla cupcakes are super cute and easy to make! They're sure to be a "hoot" at your next fall get-together!
Course: Dessert
Cuisine: American
Servings: 12 cupcakes

Ingredients

  • 12 chocolate or vanilla cupcakes store-bought or homemade
  • 1 tub chocolate or vanilla frosting
  • 24 Golden or Chocolate Oreo sandwich cookies
  • 24 Junior mints
  • 12 orange Reese’s Pieces or M&Ms candies

Instructions

  • Buy or bake cupcakes. Once the cupcakes are cooled top with frosting. (If domed, slice off the top, you want a fairly flat surface to decorate.)
  • Gently twist all the Oreo cookies in half. Place two halves with the crème filling side up on top of the frosted cupcakes to make the “eyes.” Place a dot of frosting on the back of two Junior mints to make the “pupils.”
  • Score the center of 12 Oreo cookies without crème filling and gently break in half for the “eyebrows.” Attach two eyebrows on each cupcake.
  • Place an orange candy in between the “eyes” to make a “beak.”

Notes

These cupcakes are best eaten the same day they are made as the cookies can soften.

Filed Under: Cookies, Cupcakes, DESSERTS, Fall Harvest, HOLIDAYS

Char-BOO-terie

October 20, 2022 By Cooking Mamas Leave a Comment

Print Recipe

Char-BOO-terie

Entertain your guests with this SPOOK-tacular charcuterie board!
Course: Dessert
Cuisine: American

Ingredients

CHOCOLATE & CANDY: (Select 5-6 options)

  • Reese’s Peanut Butter Cup bats
  • Peeps Marshmallow Ghosts Pumpkins, Monsters & Skulls
  • Candy or Gum Eyeballs
  • Reese’s Pieces
  • Halloween M&M’s
  • Candy Corn
  • Gummy Worms
  • Caramels
  • Caramel Corn
  • Chocolate or Yogurt Covered Raisins
  • Chocolate Covered Nuts
  • Chocolate Covered Pretzels Pumpkin, Milk or White Chocolate

PASTRIES & COOKIES: (Select 3-4 options)

  • Chocolate Cookie Skeleton
  • Pumpkin Cookies
  • Soft Batch Cookies
  • Halloween Oreos
  • Chocolate Chip Cookies
  • Chocolate Mint Cookies
  • Pirouette Hazel Nut Cookie Sticks
  • Wafer Cookies
  • Shortbread

FRUIT & NUTS: (Select 4-5 options)

  • Mandarin Oranges with Celery Stems
  • Dried Apricots & Dates
  • Grapes – Green Red and/or Black
  • Red or Green Apple Slices
  • Assorted Fresh Berries
  • Pears
  • Figs
  • Mixed Nuts
  • Cashews
  • Pistachios
  • Almonds

Instructions

  • CHOCOLATE & CANDY: Include a variety of flavors and textures, wrapped, and unwrapped.
  • PASTRIES & COOKIES: Choose a variety of cookies. Look for soft, crunchy, and sandwich filled cookies.
  • FRUIT & NUTS: Both dried and fresh fruit will add gorgeous color and lots of flavor to your charcuterie board! Nuts such as cashews, pistachios, and almonds should be shelled and salted. Mix and match selections.

Notes

I purchased the skeleton cookie here: https://www.etsy.com/shop/SimplyyyDelightfull

Filed Under: Candy, Cookies, DESSERTS, Fall Harvest, HOLIDAYS

Dungeness Crab Benedict

October 9, 2022 By Cooking Mamas Leave a Comment

Print Recipe

Dungeness Crab Benedict

Toasted English muffins topped with fresh caught Dungeness crab, poached eggs, and Heavenly Hollandaise sauce. Enjoy!
Course: Breakfast
Cuisine: American
Servings: 4

Ingredients

DUNGENESS CRAB:

  • 2 1/2 -3 c. fresh caught and cooked Dungeness Crab meat

HOLLANDAISE SAUCE:

  • 4 lg. egg yolks
  • 1 T. freshly squeezed lemon juice
  • 1/2 c. unsalted butter melted
  • 1 pinch cayenne pepper
  • 1 pinch salt

ENGLISH MUFFINS:

  • 4 English muffins split and toasted

POACHED EGGS:

  • 2 tsp. white vinegar
  • 8 lg. eggs

GARNISH:

  • Salt and pepper to taste
  • Fresh chopped parsley or chives for garnish

Instructions

  • DUNGENESS CRAB: Remove the crab meat from the refrigerator, set aside. (The crab is best at room temperature in this recipe.)
  • HOLLANDAISE SAUCE: Vigorously whisk the egg yolks and lemon juice together in a stainless-steel bowl and until the mixture is thickened and doubled in volume.
  • Place the bowl over a saucepan containing 2-inches of simmering water (or use a double boiler) the water should not touch the bottom of the bowl. Continue to whisk rapidly. Be careful not to let the eggs get too hot or they will scramble. Slowly drizzle in the melted butter and continue to whisk until the sauce is thickened and almost doubled in volume.
  • Remove from the heat, whisk in cayenne and salt. Cover and place in a warm spot until ready to use for the eggs benedict. (If the sauce gets too thick, re-warm over the double broiler, and whisk in a few drops of warm water if needed.)
  • ENGLISH MUFFINS: Preheat the oven to broil. Toast the English muffins, cut sides up, on a rimmed baking sheet. Toast until golden brown, about 1-2 minutes.
  • POACHED EGGS: Fill a 10-inch nonstick skillet half full of water. Add white vinegar to the cooking water. (This will make the egg whites cook faster and not spread.) Bring to a slow boil. Working in two batches, swirl the water to create a vortex, gently crack one egg at a time into the vortex taking care not to break the yolks. Repeat adding 3 more eggs. Reduce the heat to a gentle simmer. Cook for 3 ½ minutes until the egg white is set and yolk remains soft. Line a plate with paper towels. Remove the eggs with a slotted spoon, dab on paper towels to remove any excess water. Repeat with the remaining 4 eggs.
  • TO ASSEMBLE: Heap 1/3 cup of crab meat onto each English muffin, place 1 poached egg on top of the crab, spoon hollandaise over each poached egg. Garnish with fresh parsley and/or chives and cracked pepper to taste. Enjoy!

Filed Under: BREAKFAST, Christmas, Eggs, Eggs, ENTREE, Fish & Seafood, HOLIDAYS, Sandwiches & Wraps, Valentine's Day

Mini Choco Tacos

October 4, 2022 By Cooking Mamas Leave a Comment

Print Recipe

Mini Choco Tacos

Homemade pizzelle cookies formed into mini taco shells, filled with vanilla fudge swirl ice cream, dipped in melted chocolate, then topped with assorted sprinkles!
Course: Dessert
Cuisine: American, Mexican
Servings: 12 mini tacos

Ingredients

TACO WAFFLES:

  • 1 egg
  • 1 egg white
  • 1/4 c. plus 1 T. granulated sugar
  • 2 T. whole milk
  • 1 tsp. vanilla extract
  • 1/4 tsp. salt
  • 1/2 c. plus 2 T. all-purpose flour
  • 1/4 c. unsalted butter melted

ICE CREAM:

  • Vanilla fudge swirl, twirl, or ripple ice cream or your favorite ice cream

TOPPINGS:

  • 1 (12 oz.) bag semi-sweet chocolate melted with 1 tsp. shortening
  • Roasted peanuts or favorite nuts chopped
  • Sprinkles
  • Coconut flakes

Instructions

  • TACO WAFFLES: In a medium bowl, whisk together egg, egg white, sugar, milk, vanilla, and salt until well combined.
  • Add the flour and melted butter, whisking vigorously until fully incorporated and the batter is smooth.
  • Preheat your pizzelle press according to package instructions. Lightly oil with shortening. Fill each side with 1 tablespoon of batter. Cook according to package directions. Working quickly, lay each pizzelle over the edge of a 9×13-inch baking pan to form a “taco” shape and allow to cool completely. Repeat with remaining batter.
  • ICE CREAM: Take the ice cream out of the freezer about 5-10 minutes before you want to fill the taco waffles. Spoon ice cream into each waffle and place back into the freezer for 1-2 hours until firm.
  • TOPPINGS: In a microwave-safe bowl, microwave the chocolate and 1 teaspoon shortening for 1 minute then stir the mixture. Place the bowl back into the microwave and microwave for another 20 seconds and stir. Repeat every 20 seconds until the chocolate is completely melted and smooth.
  • TO ASSEMBLE: Working in batches (2-3 tacos at a time) quickly dip the tacos in a rolling motion into the chocolate to coat the ice cream completely. Immediately sprinkle with desired toppings. Set on a rimmed sheet pan lined with parchment paper and return to the freezer. Repeat with remaining tacos. Once frozen, store in an airtight container in the freezer for up to 1 week. Makes 12 Mini Tacos

Notes

I use a Cuisinart Pizzelle Press (WM-PZ10) that makes 4-inch pizzelles.

Filed Under: Cinco de Mayo, DESSERTS, Fall Harvest, HOLIDAYS, Ice Cream

Chicken Parmesan Soup

October 4, 2022 By Cooking Mamas Leave a Comment

Print Recipe

Chicken Parmesan Soup

If you like Chicken Parmesan (Parmigiana), then you’ll love this soup! It’s quick and easy and ready in under 30 minutes!
Course: Entrée, Soup
Cuisine: American, Italian
Servings: 6

Ingredients

  • 8 oz. rotini pasta
  • 1 T. extra virgin olive oil
  • 1/2 med. Walla Walla or yellow onion diced
  • 3 cloves garlic pressed
  • 3 T. tomato paste
  • 1 (15 oz.) can crushed tomatoes
  • 1 (15 oz.) can diced tomatoes
  • 4 c. low-sodium chicken broth
  • 1 1/2 tsp. Italian seasoning
  • 1 tsp. dried oregano
  • 1/2 tsp. crushed red pepper flakes
  • 1 lb. cooked shredded chicken breast about 2 breasts
  • 1 1/2 c. shredded mozzarella cheese
  • 1 c. grated parmesan cheese
  • Homemade croutons for garnish, optional
  • 1 T. chopped basil or parsley for garnish
  • Kosher salt and freshly ground black pepper to taste

Instructions

  • Bring a pot of salted water to a boil. Add pasta and cook until al dente according to package directions. Drain the pasta, rinse under cold water and set aside.
  • Meanwhile, heat the olive oil in a large pot over medium-high heat. Add the onions, cook stirring occasionally until soft about 5 minutes. Add the garlic, cook until fragrant about 1 minute more.
  • Stir in tomato paste, sauté for 1-2 minutes. Add the tomatoes, chicken broth, and seasonings and bring to a simmer. Add shredded chicken and cooked pasta, cook until heated through. Taste the soup and adjust the seasonings adding salt and pepper to taste.
  • Ladle soup into bowls. Top with generous amounts of shredded mozzarella and Parmesan cheese. Garnish with croutons, fresh chopped basil or parsley, and more cracked black pepper if desired.

Filed Under: Broth Soups, Chicken, ENTREE, Pasta, SOUP, Vegetable Soup

  • « Previous Page
  • 1
  • …
  • 8
  • 9
  • 10
  • 11
  • 12
  • …
  • 115
  • Next Page »

Recipe Search

Meet the Chef

Hi, I’m Dusty Hutchins-McNutt, welcome to my kitchen! Voted Best of Western Washington Top 5 Food Blogs, here you will find over 3000 Tried and True Family recipes to choose from! Read More…

Let’s Connect

  • Facebook
  • Instagram
  • Pinterest
  • Twitter

Buy Our Cookbook

Stirring Up Memories Cookbook

Stirring Up Memories Cookbook $14.95

Recently Added Recipes

Dubai Chocolate Cookies

December 13, 2025

Swedish Cream Wafers

December 12, 2025

Martha Washington Candy

December 11, 2025

Maple Walnut Fudge

December 4, 2025

Date Bark Bites

December 4, 2025

Cooking Mamas © 2009-2026. All rights reserved. Privacy Policy